Your track may sound perfect in your studio, but that does not mean streaming platforms will play it back the way you intended.
Planning a Music Release? Check These 5 Things Before You Upload

With streaming now accounting for 82% of total U.S. recorded music revenue, your master has to be prepared for how platforms actually deliver music. Loudness normalization, lossy encoding, and playback conversion can all affect your track before listeners ever hear it.
That is why every release should pass a streaming-readiness check before distribution.
Step 01
True Peak: Leave Enough Headroom for Streaming Encoders
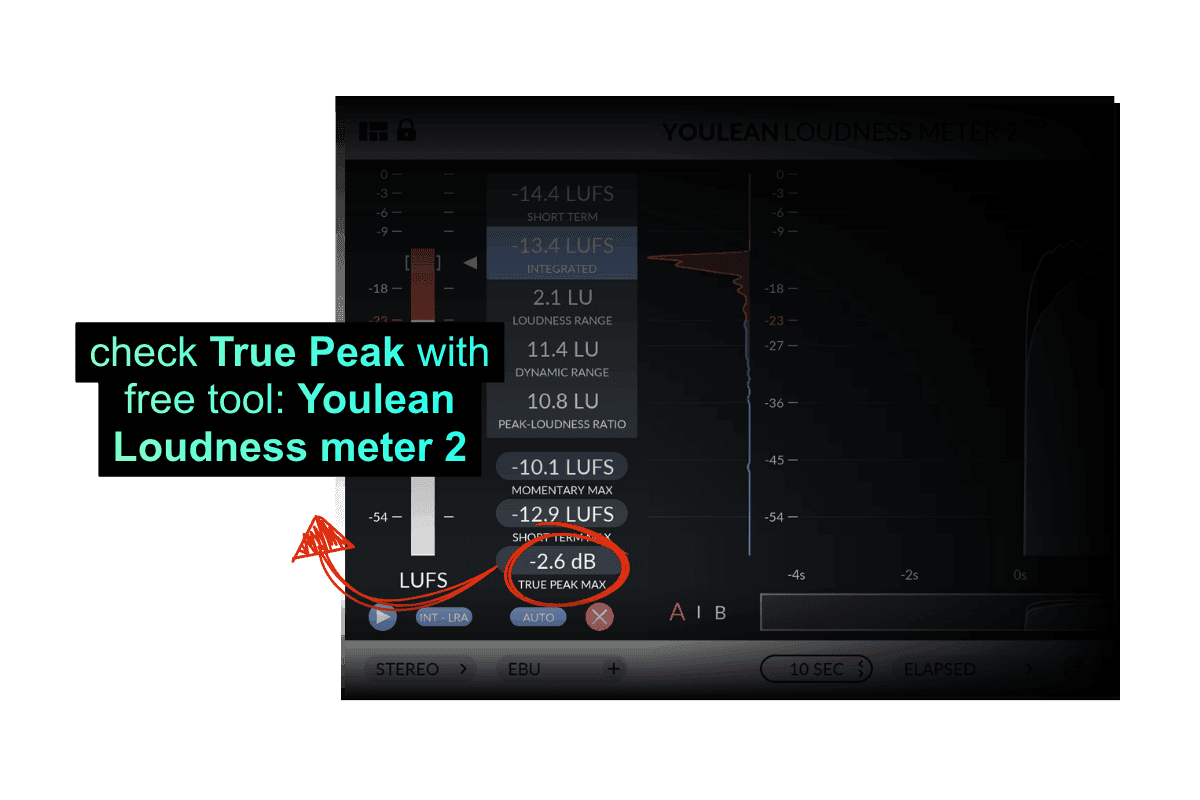
Using the Youlean Loudness Meter to check True Peak Max before releasing music on streaming platforms.
When a streaming platform converts your WAV file to a compressed format like AAC or Ogg Vorbis, inter-sample peaks can exceed 0 dBFS during encoding. The result is digital clipping, a form of distortion that was not in your original file.
Platforms like Spotify and Apple Music also apply automatic gain reduction if your file exceeds their true-peak ceiling. So even if your track does not audibly clip, a true peak that is too high can trigger a gain penalty, altering how your track plays back.
The fix is simple: keep your true peak at –1 dBTP. Some platforms recommend this to reduce distortion from lossy encoding. Treat –1 dBTP as a practical streaming-safe ceiling, not an arbitrary number.
Standard peak meters in most DAWs do not show the true peak. Use a dedicated plugin:
iZotope Ozone, iZotope Insights 2, or LEVELS by Mastering the Mix— each of which measures it accurately. Check before you export every time.
Step 02
LUFS: Match the Platform's Loudness Target
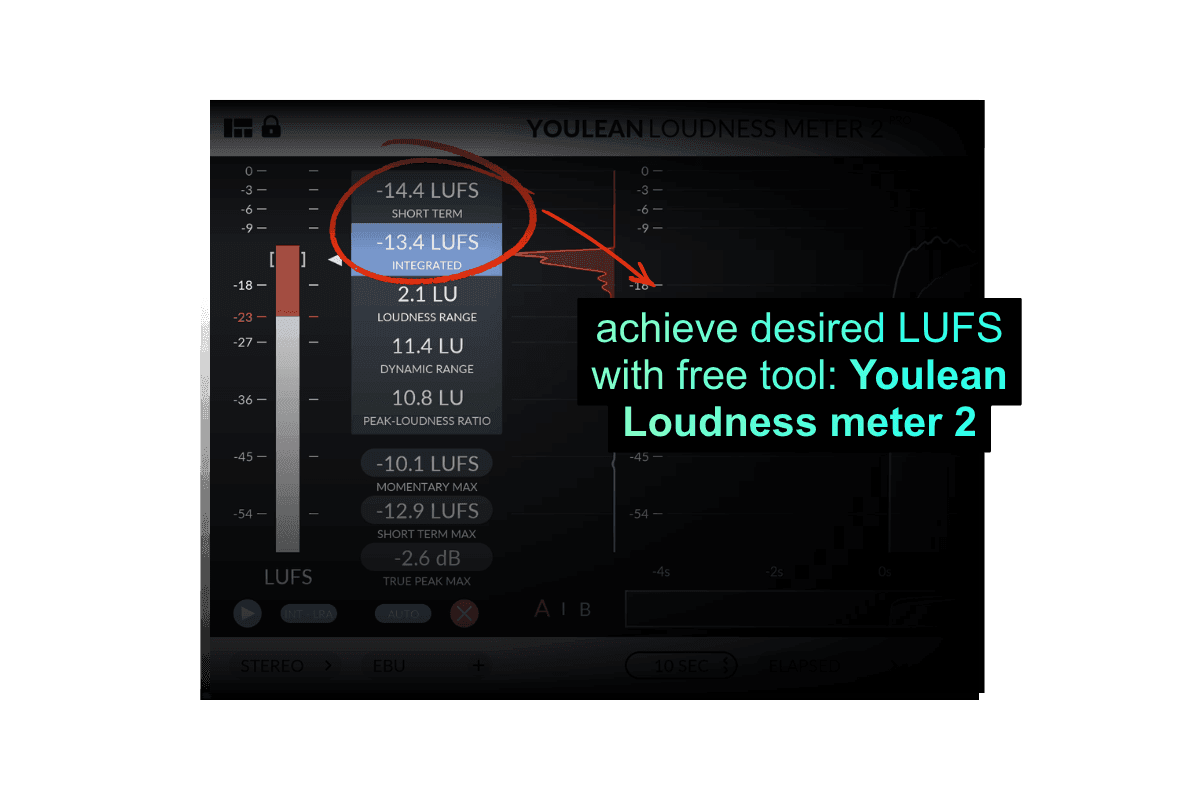
All major music streaming services use loudness normalization. They measure each track’s integrated loudness in LUFS (Loudness Units relative to Full Scale) and adjust playback volume to make music on the platform feel more consistent. If your track is louder than the platform’s playback reference, it may be turned down. If it is quieter, some services may raise it, while others may leave it as-is or limit the gain increase to preserve headroom.
But that does not mean every master has to follow the suggested LUFS exactly.
Platform targets are useful guides, not strict rules. Dance, pop, hip-hop, and other high-energy genres often need more compression and density, while classical, acoustic, jazz, or cinematic music usually needs more space and dynamic range to breathe.
The goal is to master the track to a level that sounds pleasing for the genre: loud and controlled enough to translate well, but not so crushed that it loses punch, and not so dynamic that it feels weak or inconsistent in everyday playback.
| Platform | Loudness Target | True Peak Limit | Normalization |
|---|---|---|---|
| Spotify | −14 LUFS | −1 dBTP | On by default |
| Apple Music | −16 LUFS | −1 dBTP | On by default |
| YouTube Music | −14 LUFS | −1 dBTP | On by default |
| Amazon Music | −14 LUFS | -1 / -2 dBTP | On by default |
| Tidal | −14 LUFS | −1 dBTP | User-controlled |
Step 03
File Format: Lossless and Full Resolution
Streaming platforms transcode your track into their own codecs. For example, Spotify uses Ogg Vorbis, Apple Music uses AAC; both are lossy formats that remove some data to reduce file size. That is fine from a clean, lossless source, but not from an MP3. Transcoding an already-compressed file can cause dulled highs, muddy low-mids, and audible artifacts.
Always deliver a lossless file so the platform’s encoder has the best possible source to work from. 24-bit WAV at 44,100 Hz is the standard lossless delivery format accepted by every major music streaming platform. It gives the encoder full dynamic range and a clean frequency response to work with from start to finish.
If your session was recorded or mixed at 48 kHz or 96 kHz, keep it at that rate and have your mastering engineer handle the conversion to 44.1 kHz. Poorly done sample rate conversion affects the high-frequency detail of your master. Do it once, at the mastering stage, using proper algorithms, not as an afterthought on export.
Step 04
Mono Compatibility: How Your Track Travels Beyond Headphones
Most listeners are not on studio monitors. They are on phone speakers, Bluetooth speakers, smart devices, and car audio — many of which play in mono or near-mono. When a stereo track is summed to mono, wide-panned elements can cancel out, bass can thin, and a mix that felt full can suddenly sound hollow or cluttered.
Before delivery, use a mono-summing plugin or your DAW's Utility plugin on the master bus and listen at moderate volume. Check the low end, lead vocal, and any wide-panned elements. If something important disappears or feels weak, fix it in the mix before mastering. Mono compatibility is a standard professional check, and it should be part of yours, too.
Step 05
Metadata: What Platforms Use to Place Your Track
Metadata travels with your audio file: track title, artist name, ISRC code, album title, genre, language, release date, and credits. It affects how your track is categorized, recommended, credited, and monetized.
Check these before delivery:
- ISRC code: Links each recording to usage reporting and royalty tracking. Confirm it is correct in your distributor’s metadata fields, and embed it where your workflow supports it.
- Genre and mood tags: Help platforms place your track in the right playlists, radio stations, and recommendations.
- Credits: List contributors accurately: producers, songwriters, featured artists, engineers, and performers.
- Artist name: Keep it identical across every release to avoid duplicate profiles and split listener data.
Clean metadata helps your track reach the right audience, credit the right people, and collect royalties correctly.
Want to Make Your Track Streaming-Ready in Minutes?
Are you interested in making your track ready for streaming platforms in minutes? Remasterify analyzes your track’s genre, tone, energy, and overall character, then applies AI mastering to improve clarity, reduce background noise when needed, adjust EQ, and keep the dynamics controlled without crushing the life out of the song
You can export with the true peak set to -1 dBTP, choose a loudness level that fits your genre and platform goals, and download a lossless WAV or HD WAV file for upload. Sample rate options start at the standard 44.1 kHz and go up to 96 kHz, so you can choose the right resolution for your release.
Remasterify also gives you control over stereo width. You can make a track slightly narrower to reduce phase-related issues, or make it wider and more immersive if the mix feels too centered. In addition, Remasterify allows you to edit key metadata, helping you prepare essential track information alongside the audio master.
n short, it helps you create a clean, balanced, platform-ready master while covering most of the technical steps needed to prepare your song for streaming.
Final Step
Then Pick Your Distributor
Once your track is technically ready, you need a digital distributor to put it on music streaming platforms. Services like DistroKid, TuneCore, and CD Baby all deliver to the same major services: Spotify, Apple Music, Amazon Music, Tidal, YouTube Music, and more.
DistroKid charges a flat yearly fee and keeps none of your royalties. CD Baby charges per release and gives you a permanent deal with no ongoing fee. Neither is wrong — it depends on how often you release and how long you plan to keep your music live.
What no distributor does is check your LUFS, your true peak, your file format, or your metadata for you. Distributors collect your metadata, but verifying its accuracy and completeness is your responsibility.
Frequently Asked Questions
How to master a track for streaming?
Mastering is the final stage of audio processing, where your mix is polished, balanced in loudness, and prepared for distribution. You can master manually using a DAW and dedicated tools, or use an AI-powered service to streamline the process.
Remasterify, for example, analyzes your track and applies AI mastering to improve clarity, control dynamics, set proper loudness, and export in a lossless format suitable for streaming platforms at -1 dBTP.
Do I need to master my track to -14 LUFS for every streaming platform?
No. -14 LUFS is a useful reference, not a strict rule. Some genres, like dance, pop, hip-hop, and rock, may need a louder and more compressed master. Others, like classical, jazz, acoustic, or cinematic music, often need more dynamic range.
Why should I upload a WAV file instead of an MP3?
A WAV file is lossless, which means it gives the streaming platform a clean, full-quality source to work from. An MP3 is already compressed. If you upload an MP3, the platform compresses it again into its own streaming format, which can cause dull highs, muddy low-mids, and audible artifacts.
Can stereo width affect how my track sounds on phones and speakers?
Yes. If a track is too wide, some elements can weaken or disappear when played in mono or near-mono, which is common on phones, Bluetooth speakers, smart devices, and some car systems. Checking stereo width and mono compatibility helps your track stay clear, full, and balanced across everyday listening devices.
Ready to Release Your Best Sound?
Get a clean, balanced, streaming-ready master in minutes.